It's been a great first start of the season despite the warm winter. Now May has settled over us and I have a few thoughts about our journey so far. It's been seven months since we've moved to our little homestead. So here is what has happened so far:
BUGS! Many many bugs. I believe the warm winter facilitated the explosion of beetles and stink bugs. Also around late winter we had an infestation of Asian Lady beetles. Bad. We were trying to remove a stump when these tiny lady bug imposters swarmed from some hell hole by the barn and saturated the air around us. We were all covered head to toe. Their stinging bites (I heard that they don't bite but their little insectile feet can pinch hard) making us run for cover into the house. As we beat off the few that rode us in we noticed at every corner of our home they were flooding in. Not a surprise since this house is super old (1928 build). We surmised they came from the sagging old windows so we immediately taped everything that might be a gap. Then my daughter took the vacuum and collected the intruders.
Garden wise Texas has a bad leaf footed bug problem, AKA: stink bugs. They LOVE berries, tomatoes and fruit trees. They love destroying fruit by burrowing into them. I've lost a dozen heirloom tomatoes so far. I'm a fierce warrior with my spray bottle of Dawn soap and water. Quick tip: 1 generous tablespoon of Dawn liquid soap to one gallons of water. Slay! Spray directly on bugs and they usually die with one minute, sooner if they are bigger for some odd reason. I spray early morning and afternoons if I'm able. They've made my Goji berry bushes a love nest. Fine by me since it makes it easier to kill.
Another pest that seems in abundance here on our two acres, cabbage worms and other things that love eating my kale and cauliflower. I actually got BT for them, they were getting too numerous to pluck off and keep ahead of them.
Finally on the list of pests but not necessarily a bug, rodents. Gophers, voles and mice. Lost three tomato plants, several squash plants and one eggplant. I've tried a lot of things but the barn and surrounding structures offer too much shelter for them. The barn is coming down in the next couple of years.
So after all the trials we faced with pests I now know what this land offers. Great soil but even greater pests. Things spring to life here in a very surprising way. Seems the hundreds of years these old oak trees have shed their leaves has left a very loamy and fertile medium. We were up to our eyeballs in potatoes , carrots and cucumbers. Tomatoes that have survived the stink bug infestation still number greatly on my island butcher block. Peppers are finally coming in as well, more jalapeños then I know what do do with. I've been pickling what I can.
With the ongoing bug battles and garden tending there are days that are slow. It's not something that comes around too often. Really what is happening is I ignore what is happening outside and do something that gives me a break. There is always something to clean, organize, down-size and build. Always. If you live in a homestead the laundry list of chores and projects can only grow and at times minimize but never complete.
Currently my list of things number so greatly that money is now a factor in getting things accomplished. We want to build a secured garden to keep our pests down to a minimum, barn tear down, dog run, chicken coop, water well, and home renovation.
That's just the big stuff. The everyday is something else. We live by a busy road so there's garbage that flies in from mindless troglodytes, keeping our wild bees from going thirsty and tons and tons of brush and small trees that need to be cleared and burned. We got some burned which supplied us with biochar.
Then there's my dogs that need social time and care. Shibas are a very needy type dog. They crave attention almost always so when I'm doing chores I like to take breaks to give them the love they deserve. Shibas also have undercoats that blow out twice a year and that takes over a month to finally brush out completely.
I know I'm new to this and I may have over planted this first time around. At times it does get overwhelming and there are days I close the door and ignore my responsibilities outside. It's few and far between that this happens. I cringe when I think of adding chickens and ducks when I feel these days creep up in me and all I want to do is stay in my PJs. It takes getting into a battle rhythm to bust me out of the funk. I have many worries and thoughts about being able to make a functional hobby homestead. It's not because I don't think I can go through with all that it entails but more along the lines of me freaking out because I'm just one person and the list of chores never ceases.
Yeah I have a lot of worries. So far, I've enjoyed our time here more than anything. Harvesting fruits from plants I grew from seed, and picking flowers of varieties I've always dreamed about. Not to mention the views of fireflies, eagles, sounds of owls and the space 2.5 acres provide. It's a working dream. Sure the house is slanted, can't flush the toilet when it rains and the random raccoons can make it a struggle but we love it here. The potential is vast and it just needs some commitment.
We are currently in budget crunch from saving. We want to renovate the house as soon as possible to get the biggest unknown variable under control. We don't want the house to deteriorate to the point of us having to move out to handle it. We were going to wait a few years but we don't think the house will remain in its current condition by waiting. We did however get one of our biggest debts paid off so YAY!!! Before we undertake this transformation we wanted to get our rental house across town sold so our income to debt ratio looks promising. We are saving a nest egg for the probability of us going backwards on our rental house.
We got to do what is necessary to get our debt undercontrol which in the long run gets us to where we want to be with our homestead. So big money projects have to wait. On that note, next growing season I will be scaling back to my raised bed area and do what I can with that small space. The amount of headaches from not having a solidified garden shed, hardware cloth protected beds and a better localized water source is not worth it.
But maybe next year we will be saving towards these things. Actually more like towards the beginning of Fall next year I can see us being in a position to build a great garden space. Mean time I have a good long summer to keep battling for the success of my current garden. Seed saving, canning and pickling are the order of the day.
It's ok to feel overwhelmed at times and it's ok to take a break. If you are new to homesteading please go slow. Start with growing what you can handle on your own then as you get a good head on what your daily life will entail slowly add to your homestead.
Time for me to go clean a yucky kitchen.
The old schoolhouse barn

We have been thinking and rattling our brains on how to save it. Money is tight.
Wednesday, May 17, 2017
Thursday, February 23, 2017
Spring Came in Feburary
Well winter came and went so fast that trees that shed their leaves regained new growth three-four weeks later. We had maybe two real cold chills and then we remained between high 30s and low 40s during the night and high 70s low 80s during the day for most of the time. We actually reached 90 degree weather today, yuck. No way it's February!
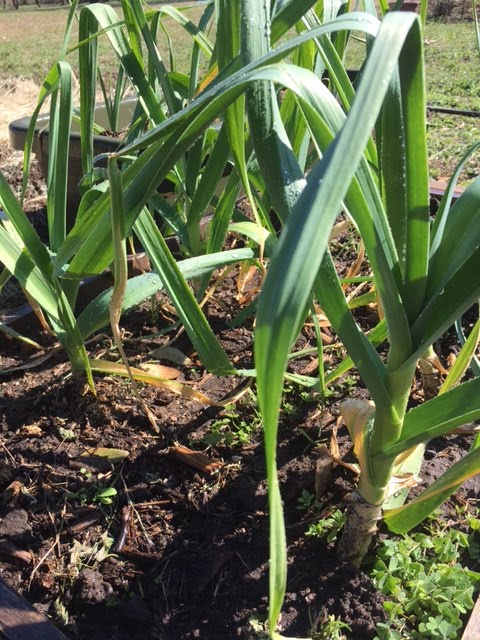
I had planted garlics right before Fall, not entirely sure if they will produce bulbs. The growth has really taken off the last two weeks, they look like miniature corn stalks.

The husband and I were discussing perhaps we can chill the cloves before planting in winter to give them the necessary chill hours. We wanted to grow garlics as a main staple on the farm but if Texas weather keeps being this screwy we may have to rethink our plans.
I got most of the planting accomplished this week. I was able to plop in the beds tomatoes, artichokes, zucchini, lima beans, sugar snap peas, kale, swiss chard, grapes, blackberries and many flowers. So far one tomatoes plant and one artichoke plant were met with untimely demise via the heat and some fat footed animal walking in the beds.
We suffered two mild casualties when our new lemon trees died back from the first frost. However, we saw sprouting buds WAY down the dead trunk. So not a total loss but in my eyes it might as well be because they are going to remain ugly and tiny for a long time. I might buy two more, I need organic lemons this summer for mead and teas. For real though!

We acquired three pear trees from a San Antonio Park and Recreations function when they hosted a fruit tree adoption celebration. The line started at 4 a.m. and the event didn't start till 8:30!

Yes, it was raining and chilly. :)
My mother in law came along with us and gave us her tree. Kieffer Pear trees are doing excellent right now and producing many shiny new leaves. Keeping my fingers crossed that they do well this season but I'm not expecting fruit this year. Although, they are LARGE trees so maybe just maybe they are the right age for production.
Our fig trees have put on large leaves before any other tree on our property and they are chugging along.

I would love to have fruit this year from them and use it as a sugar substitute. Also my husband has yet to eat a fresh fig and I want it to be from our trees.
This last month I've been running around getting beds made and figuring out low cost or free borders. We had felled three large trees and I've been using logs to border beds and large branches in the beds as a hugelkultur.


We have a large berm at the back of the property that's all soil from logs and wood decaying over the last ten years. I've used some of that to fill beds along with the native soil, haven't had to buy soil this time around. Free is always good! I dug the beds down, threw logs and branches then add other amendments like kitchen scraps, worm compost, composted yard clippings and composted chicken manure.
I also have fish emulsion brewing in a garbage bin and just today we cut our grass for the first time since last Fall and those clippings are being fermented in another 35 gallon garbage bin filled with rainwater. I will be adding kitchen scraps tomorrow. I got the idea from one of my favorite composting enthusiast and Youtuber, Dave The Good. He has a book called, "Compost Everything", available on Amazon. I got it for the Kindle at a cheap price so definitely worth the three bucks. He doesn't give precise measurements and he tends to ramble just a tiny bit but it has helped me with the problem of not having enough compost. He discussed making a thing called a "melon pit". Its basically making a two-three foot hole, throw in bones, any remnants of spoiled leftovers, kitchen scraps and some carbon. Then fill it back in with dirt and mound it and plant your seeds in it. I have made two pits so far and planted watermelon seeds in them. Will keep posted on progress of the whole shabang-a-bang.
During the course of making regular compost in the bins my husband built me last summer, we have come across some wildlife obstacles. Every morning I go out to the compost bins to throw in a banana peel or tea bags and some jerk face critter had eaten what little things I'd thrown in. The bins are sealed on four sides but they chewed through the plastic mesh and got in to claim their prize. So I attached some old metal fencing to the sides of the active bin. That night I threw in more kitchen scraps and some old cake, confident that nothing can break into my little Fort Knocks. I however forgot about the top, it was wide open. I didn't think the animal would scale the four foot high bin and risk getting trapped inside. But anything for cake, am I right? I can't say I blame them. So I threw another fence panel on the top and zip tied it to the other panels. The next night, the asshole flea bag wrestled the door off the hinge. SO, I then added a cargo strap to the door and squeezed some kitchen scraps through the bars of the panels. SUCCESS! I saw evidence of an animal unable to get into the bins. Saw lots of scratches in the dirt from it trying to pry anything open.
My father in law, after listening to our tales of pilfering night creatures, said he had a raccoon trap and we could use it. So we baited the trap and set it by the bins and after three nights we finally caught the culprit, it was a large possum.

Lets just say he is no longer a resident on our property.
Other than the possum we have gophers on property and we are meeting them with lethal force. I don't relish the thought of losing my entire garden and fruit trees. So far I've used poison pellets and smoke bombs. We are also throwing out castor oil and will systematically keep going to the fence line with it. We will also be buying the vibration spikes. This is an ongoing battle, probably till we decide we don't want to live here anymore or when we die. These gophers are numerous and on each side of us via our neighbors. Once we finish burning our huge brush pile we will be working on a secured garden area with cinder blocks three foot below the surface all along the perimeter of the garden. Then we will dig out whatever tunnels in the garden area with a front end loader to completely evict them, set up vibration spikes and wait to see if any new gopher mounds pop up.
Other than minor animal annoyances things on the homestead are moving right along into Spring.

With as hot as it gets here in Texas I may just limit my outdoors to morning hours and evening hours. It would also give me the time I need to start my yarn business back up and maybe also include some crocheted items to my Etsy store. We shall see, I need to find a rhythm before adding more projects to the mix. Also I need to remind myself that even though things might not turn out the way I had hoped that there's nothing planted here I can't plant again. This is the year for learning and enjoying the journey.
I had planted garlics right before Fall, not entirely sure if they will produce bulbs. The growth has really taken off the last two weeks, they look like miniature corn stalks.
The husband and I were discussing perhaps we can chill the cloves before planting in winter to give them the necessary chill hours. We wanted to grow garlics as a main staple on the farm but if Texas weather keeps being this screwy we may have to rethink our plans.
I got most of the planting accomplished this week. I was able to plop in the beds tomatoes, artichokes, zucchini, lima beans, sugar snap peas, kale, swiss chard, grapes, blackberries and many flowers. So far one tomatoes plant and one artichoke plant were met with untimely demise via the heat and some fat footed animal walking in the beds.
We suffered two mild casualties when our new lemon trees died back from the first frost. However, we saw sprouting buds WAY down the dead trunk. So not a total loss but in my eyes it might as well be because they are going to remain ugly and tiny for a long time. I might buy two more, I need organic lemons this summer for mead and teas. For real though!

We acquired three pear trees from a San Antonio Park and Recreations function when they hosted a fruit tree adoption celebration. The line started at 4 a.m. and the event didn't start till 8:30!

Yes, it was raining and chilly. :)
My mother in law came along with us and gave us her tree. Kieffer Pear trees are doing excellent right now and producing many shiny new leaves. Keeping my fingers crossed that they do well this season but I'm not expecting fruit this year. Although, they are LARGE trees so maybe just maybe they are the right age for production.
Our fig trees have put on large leaves before any other tree on our property and they are chugging along.

I would love to have fruit this year from them and use it as a sugar substitute. Also my husband has yet to eat a fresh fig and I want it to be from our trees.
This last month I've been running around getting beds made and figuring out low cost or free borders. We had felled three large trees and I've been using logs to border beds and large branches in the beds as a hugelkultur.


We have a large berm at the back of the property that's all soil from logs and wood decaying over the last ten years. I've used some of that to fill beds along with the native soil, haven't had to buy soil this time around. Free is always good! I dug the beds down, threw logs and branches then add other amendments like kitchen scraps, worm compost, composted yard clippings and composted chicken manure.
I also have fish emulsion brewing in a garbage bin and just today we cut our grass for the first time since last Fall and those clippings are being fermented in another 35 gallon garbage bin filled with rainwater. I will be adding kitchen scraps tomorrow. I got the idea from one of my favorite composting enthusiast and Youtuber, Dave The Good. He has a book called, "Compost Everything", available on Amazon. I got it for the Kindle at a cheap price so definitely worth the three bucks. He doesn't give precise measurements and he tends to ramble just a tiny bit but it has helped me with the problem of not having enough compost. He discussed making a thing called a "melon pit". Its basically making a two-three foot hole, throw in bones, any remnants of spoiled leftovers, kitchen scraps and some carbon. Then fill it back in with dirt and mound it and plant your seeds in it. I have made two pits so far and planted watermelon seeds in them. Will keep posted on progress of the whole shabang-a-bang.
During the course of making regular compost in the bins my husband built me last summer, we have come across some wildlife obstacles. Every morning I go out to the compost bins to throw in a banana peel or tea bags and some jerk face critter had eaten what little things I'd thrown in. The bins are sealed on four sides but they chewed through the plastic mesh and got in to claim their prize. So I attached some old metal fencing to the sides of the active bin. That night I threw in more kitchen scraps and some old cake, confident that nothing can break into my little Fort Knocks. I however forgot about the top, it was wide open. I didn't think the animal would scale the four foot high bin and risk getting trapped inside. But anything for cake, am I right? I can't say I blame them. So I threw another fence panel on the top and zip tied it to the other panels. The next night, the asshole flea bag wrestled the door off the hinge. SO, I then added a cargo strap to the door and squeezed some kitchen scraps through the bars of the panels. SUCCESS! I saw evidence of an animal unable to get into the bins. Saw lots of scratches in the dirt from it trying to pry anything open.
My father in law, after listening to our tales of pilfering night creatures, said he had a raccoon trap and we could use it. So we baited the trap and set it by the bins and after three nights we finally caught the culprit, it was a large possum.

Lets just say he is no longer a resident on our property.
Other than the possum we have gophers on property and we are meeting them with lethal force. I don't relish the thought of losing my entire garden and fruit trees. So far I've used poison pellets and smoke bombs. We are also throwing out castor oil and will systematically keep going to the fence line with it. We will also be buying the vibration spikes. This is an ongoing battle, probably till we decide we don't want to live here anymore or when we die. These gophers are numerous and on each side of us via our neighbors. Once we finish burning our huge brush pile we will be working on a secured garden area with cinder blocks three foot below the surface all along the perimeter of the garden. Then we will dig out whatever tunnels in the garden area with a front end loader to completely evict them, set up vibration spikes and wait to see if any new gopher mounds pop up.
Other than minor animal annoyances things on the homestead are moving right along into Spring.

With as hot as it gets here in Texas I may just limit my outdoors to morning hours and evening hours. It would also give me the time I need to start my yarn business back up and maybe also include some crocheted items to my Etsy store. We shall see, I need to find a rhythm before adding more projects to the mix. Also I need to remind myself that even though things might not turn out the way I had hoped that there's nothing planted here I can't plant again. This is the year for learning and enjoying the journey.
Sunday, January 22, 2017
Fermented Tea, Culture Capture and Fizzy fruit
I'm sure some of you out there have heard of kombucha, the drink that is fermented into a vinegar/sweet drink. I have tried it and can't say I'm a big fan. It was the vinegar after taste that was hard for me to get around. I loved the health aspects of kombucha but that taste was too much. Perhaps there are flavors that would mask it or I just grabbed a flavor that wasn't very good, either way, I haven't tried it again.
Sometime ago I ventured into brewing mead. I transferred naturally captured yeasts from batch to batch via a bug/mother that I kept fed with honey and filtered water. It bubbled vigorously, enough to make me wonder just how fizzy it really was. I took a few sips, it was a vibrant effervescent soda. It was flavored with organic lemons from my mother in-laws's trees which had me knee deep in lemon meads. This gave me the idea to make a natural soda. (Come to find out there are so many recipes out there for natural sodas but I found out via experimenting)


I had a batch of tea in a sun tea vessel that I ushered into the house after a long warm day of brewing. I sliced lemons and apples into chunks and plopped them in the tea along with a heaping cup of honey and the mead bug. I then covered with a kitchen cloth and let the little yeast go to work. It took about three days to get a healthy bubbly brew. Tea on its own is pretty tasty but adding the fizzy live culture adds a great refreshing kick, especially after working outside in the heat all day.
I also had a terrible soda addiction that seems to be at bay now that I have these ferment/active culture teas. So far its been over a month and I still have the initial culture that has worked many past batches of tea.
Follow me on Instagram for video of the active culture. I tried linking the video here but no such luck!
IG account: rieper_reptilias
I post there fairly frequent as oppose to blogging which is sometimes a week or a week and a half between posts.

Want to make a batch for yourself? Well follow these simple culture capture steps and you will be on your way. I find capturing a mother/bug first would be best instead of brewing a whole quart of tea off the get-go.

The Mother/Bug Recipe:
You will need:
* a large size glass jar (old honey jar or jam jar with lid)
*kitchen towel or paper towel that will cover the opening of jar
*rubber band
*Organic fruit, sliced with peels on (I started with lemons but apples would work just as great. I haven't tried other fruits just yet but I would imagine it would be fine to use pear, peaches and berries.)
*honey or sugar (the quantities will be in steps)
*filtered water (enough to fill your jar half way)
Steps:
1) Fill your jar half way with filtered water. The amount of honey or sugar to use will seem extreme but use 1 cup if honey or half a cup if sugar. If you don't have a large jam jar and had to use something small then 1/2 of sugar or honey would be best.
OPTION: you can warm (not boil) up the water and add your honey or sugar to get even dilution before adding fruit
2) Add chunks of your fruit into the jar make sure the liquid levels are not at the very top of jar. Give yourself some space to be able to stir and not make a mess plus once active, fizz and fruit can rise.
3) Cover with towel and secure with rubber band. Set somewhere warm and out of direct light.
4) Stir once a day for three days.
You should see some activity around the third day, little bubbles or, if you are lucky, full on bubbling. If not don't sweat it, stir the jar and set aside. Take note that fruit isn't molding, it might brown but should never mold.
Once you see some bubbling, especially after you stir, your bug is ready to start working your batch of tea.
***NOTE***I leave the fruit in the mother so it has a source of sugars to eat while it stores. Also I found it keeps the bug and tea brew fizzy longer. Plus I love flavored teas. Apple and lemon are my favorites but orange and cloves is pretty amazing too. I recommend experimenting with added flavors like cloves, mint, etc...

Tea Brew Items Needed:
*Sun Tea Brew Glass vessel with spigot (just a little over a quart/gallon, small enough to fit in fridge)
* Kitchen towel big enough to cover entire opening of glass vessel
* Rubberband big enough to secure towel to glass vessel
* 1 cup of Honey or 3/4 cup of Sugar
* Organic Fruit chopped with peels on
* Any Tea you like 4-5 bags or half a cup of loose leaf( I use black tea and yunnan tea)
* Filtered water (enough water to boil tea then also to fill vessel)
* Spoon long enough to reach bottom of vessel to stir
* Mother/Bug ( I use about 1/4 of the liquid, avoid dumping the fruit it.)
STEPS:
1) Heat up water to a boil in a medium pot, turn off the heat and add tea. Let the tea cool down enough where you are able to insert a finger in brew without discomfort. This is to ensure that you don't accidentally boil your culture when it gets added. Strain out tea then add your honey or sugar and stir till incorporated.
2) Fill your glass vessel with the tea brew, add filtered water till your jar is 80% full. Add your fruit and the mother/bug. Give it a good long stir.
3) Covered with kitchen towel and secure with rubber band. Place somewhere warm and out of the way. Next day give it a stir and cover, you will stir once a day for three days.

4) Sample your tea. Is the fizziness noticeable? Is it too sweet? Is it not fizzy?
Troubleshooting:
Not fizzy? Answer: add 1/4 cup of sugar, honey or fruit juice and stir again. Try again in a few hours.
Is it too sweet? Answer: Allow to sit out one more day and sample again. The culture will eventually tone down the sweetness even if you place it in the fridge. I've had batches that the sweetness all but disappeared after two days in the fridge. It had something like a ghost sweetness, it was weird but totally cool :0
5) Place your finished tea in the fridge. It keeps for awhile but if you don't drink tea as often as say once a day, then make sure you are sampling the brew before next use. The sweetness could be gone. Just add more sugar or honey.
NOTE: After you are done with obtaining the small amount from the mother, replenish what you took by adding filtered water, more sugar and stir. Allow the mother to sit out one day then cover with lid and place in fridge. You can keep your original culture going and ensuring a healthy bug with each feeding. I tend to go through my teas every three to four days. (I use two sun tea brew vessels, about a quart size). I feed my mother regularly after I take from her.
Play with different teas, fruits and sweetness levels. It's a bit of an art form but extremely worth it especially if you want to kick your soda addiction. Also it's a healthy thing to do for your gut microbes. I also encourage you to keep the old fruit from previous batches to help kick start your future brews. I tend to keep them for three batches then replace them with freshly sliced fruit.
Thursday, January 19, 2017
Early Seed Starts
I love artichokes and purchasing them requires some life choices in the grocery store which have me shuffling my feet and wondering if I need toothpaste and deodorant that month.
Since acquiring our land, I dreamt of artichokes. Harvesting bucket LOADS and throwing them up in the air like a dream sequence when someone wins money. End shot would be with my hair up in a romantic style, in full day time television drama makeup and adorned in diamonds whilst sipping my wine in a bathtub full of artichokes.
<DREAM SEQUENCE END>
The reality is, I've never grown an artichoke before and so I went to the library of quick knowledge, YouTube. I realize that I go there a lot, and no, I have never picked up a book. Not that I wouldn't pick up a book and read about all the hundreds of things I want to grow and how to do it, I'm a visual learner. I need to see it in works, real time. So forgive me if I mention it often. I know there are people who scoff at using YouTube to learn homesteading but then again they themselves are putting up videos on 'how to..."
<RANT END>
whew...sorry heh
I watch quite a few videos and some talk about using all these addition to soils and testing soils. Perhaps I should, but right now I have no such things to do so and money is tight in these parts. I HOPE that just enriching the soil with different composts and ensuring it drains well will be ok. You will be going on this journey with me if you stick around.
Seeds I'm using, Purple of Romagna.

I'm starting them indoors in my tiny green house/laundry/pantry/// back porch. Space is tight but my handy hubby made a GREAT seedling shelf with a cedar board taken from our barn.
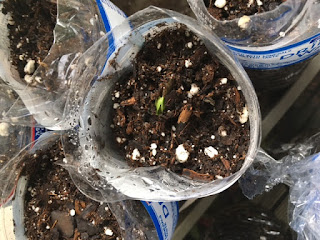
When I first planted the seeds I used some regular seed start pots. WRONG. Bad. Three days after I had planted the seeds I found out that artichokes need root trainer pots, they have tap roots that go deep. I wasn't going back to the garden center BUT I did have many empty plastic bottles from a free case of water. I went digging in the recycle bin and cut the tops off all the bottles. I used basic potting soil mix and some compost which I sprinkled at the bottom of the bottles.
I then recovered a dozen seeds and placed them in their new homes. A few days later I got three sprouts.


I imagine that germination isn't going to be 100% so I waited a few more days. My curiosity did win out so a couple of days ago I shuffled through the soils and found a couple had rotted and others were too deep. I readjusted a couple and added new seeds to the rotted seed bottles. This morning I discovered a new sprout poking through the soil.
I'm going to give the others another week then I may reuse the soil for other things. Like I said, space is tight. Artichokes should be started indoors 2-3 months before planting outside after threat of frost is gone. In Texas our last frost is usually early maybe late March. Winter here has been rather warm and came really late. I got a feeling that April maybe the true month to plant. Once they have matured in the garden I hear that they will over winter well in Texas, zone 8b.
This weekend I will start tomatoes and peppers along with cucumbers. I will probably change my mind and do it today. I'm so flighty that way. There's a dozen avocado saplings in the green room that need to make their way into our computer room so I have the extra shelf space. I can't wait till we get a real greenhouse!
Since acquiring our land, I dreamt of artichokes. Harvesting bucket LOADS and throwing them up in the air like a dream sequence when someone wins money. End shot would be with my hair up in a romantic style, in full day time television drama makeup and adorned in diamonds whilst sipping my wine in a bathtub full of artichokes.
<DREAM SEQUENCE END>
The reality is, I've never grown an artichoke before and so I went to the library of quick knowledge, YouTube. I realize that I go there a lot, and no, I have never picked up a book. Not that I wouldn't pick up a book and read about all the hundreds of things I want to grow and how to do it, I'm a visual learner. I need to see it in works, real time. So forgive me if I mention it often. I know there are people who scoff at using YouTube to learn homesteading but then again they themselves are putting up videos on 'how to..."
<RANT END>
whew...sorry heh
I watch quite a few videos and some talk about using all these addition to soils and testing soils. Perhaps I should, but right now I have no such things to do so and money is tight in these parts. I HOPE that just enriching the soil with different composts and ensuring it drains well will be ok. You will be going on this journey with me if you stick around.
Seeds I'm using, Purple of Romagna.

I'm starting them indoors in my tiny green house/laundry/pantry/// back porch. Space is tight but my handy hubby made a GREAT seedling shelf with a cedar board taken from our barn.
When I first planted the seeds I used some regular seed start pots. WRONG. Bad. Three days after I had planted the seeds I found out that artichokes need root trainer pots, they have tap roots that go deep. I wasn't going back to the garden center BUT I did have many empty plastic bottles from a free case of water. I went digging in the recycle bin and cut the tops off all the bottles. I used basic potting soil mix and some compost which I sprinkled at the bottom of the bottles.
I then recovered a dozen seeds and placed them in their new homes. A few days later I got three sprouts.


I imagine that germination isn't going to be 100% so I waited a few more days. My curiosity did win out so a couple of days ago I shuffled through the soils and found a couple had rotted and others were too deep. I readjusted a couple and added new seeds to the rotted seed bottles. This morning I discovered a new sprout poking through the soil.

I'm going to give the others another week then I may reuse the soil for other things. Like I said, space is tight. Artichokes should be started indoors 2-3 months before planting outside after threat of frost is gone. In Texas our last frost is usually early maybe late March. Winter here has been rather warm and came really late. I got a feeling that April maybe the true month to plant. Once they have matured in the garden I hear that they will over winter well in Texas, zone 8b.
This weekend I will start tomatoes and peppers along with cucumbers. I will probably change my mind and do it today. I'm so flighty that way. There's a dozen avocado saplings in the green room that need to make their way into our computer room so I have the extra shelf space. I can't wait till we get a real greenhouse!
Tuesday, January 17, 2017
Our Future Planting Beds
As Winter hits and things are on auto pilot, I was researching all the seeds I would want to plant this coming Spring. I'm still debating on all the varieties I would love to see this season. I also have to face facts that I would be the sole eater of many of the things I grow. My husband has a short bucket list of veggies that make it into his mouth.


One thing is for sure, I want stuff that stores well and that I can harvest seeds from if able. Of course, I have my tomato seeds selected, those are a no brainer along with carrots and potatoes. Greens are a must as well but how much and what varieties? That's is the question across the board with everything else.
I might be in a slight analysis paralysis. So in effort to pull myself out of this I started building beds. I do love a raised bed but that's a costly thing. Building all the uniform raised beds would be VERY labor intensive. Not to mention we just don't have the money, tools and space to build such things. Maybe later down the road we can build pretty raised beds with new materials that will last.
So I decided in-ground planting was best and I will be using hugelkultur methods in two forms, low level and top level. We had success in the single raised bed we built last summer burying logs under the soil. Soil held moisture in the hot summers of south Texas and provided the mycelium to help break things down. That coupled with compost made a good winner in my books.
My daughter helped a great deal! If it wasn't for her I would probably have only gotten one done so far. Lots of digging, soil shuffling, wood cutting (with axe) and log dragging.
We started with the tomato bed. This will need to be big because I plan on growing enough to can and to save seeds. Plus I would probably do a lot of grazing.

We dug down deep for this bed because it does stay humid in SA. We don't want to have to water the tomatoes all the time and risk fungus infections. I rather have to water infrequently and have the soil stay nice a moist deep down. We probably dug down a good 2 ft and lined the bottom with big logs and many limbs. We used composted dirt from a large wood and brush pile that is 10 years old, worm casting, regular compost and leaf mold all mixed together. Then I added egg shell dust, banana peels, comfrey clippings and a three gallon jug of failed mead. So basically, wood, dirt, amendments and more dirt. Then we covered it all with straw then watered it down and laid some coverings to keep the soil protected from sun, wash out and scavengers.

Then we construction small beds the same way a few with above ground hugelkultur method. These will be for greens and maybe squash. One of these beds is home to two goji berries, so crossing fingers that the frost didn't kill them.
I have some rough plans I sketched out.

When I get a handle on all the beds and what is going to get placed in them I will blog more on the construction progress. The potato beds and carrots bed locations are picked out. I might bite the bullet and build a large raised bed for the potatoes and utilize large pots. I have three sweet potato varieties purchased and we will be doing some regular potatoes too.
Sourdough Recipe for People Like Me, The Frustrated.
There are tons of sourdough recipes out there for your perusing enjoyment. I have went through many tutorials from blogs, books and videos. Technical recipes that have had all the love and art form removed from it's precise and tedious hands. Sorry, I sound bitter..SOUR even. <ahem>
My whole life as someone who cooks with her heart and her taste buds, using scales and measurements devices all have been a loosely suggested idea. I scoffed and turned my nose up at such things. I am a conductor and flavors are an orchestrated symphony that knows no limits and no measuring spoon or cup. Till I got into baking. Ego deflated....
I could go on and on about all the failures but instead let's get on with what I found that works. Over the long course of time I have managed to make some strong and healthy starters. Nothing compared to the first starter I made when we were living in Okinawa. It was a ravenous thing that seemed to take a life of its own. Looked like it wanted come out of the jar to find its own damn flour to eat. Even though I failed at the breads, the starter has always been an easy thing for me to make.
Ok, sourdough enthusiasts if it's your first time let's begin with the starter. I suggest using an unbleached flour to get things rolling. I used King Arthur brand, white or wheat I've had success with each.
Once you have selected a nice large bag of flour you will need:
* large bowl that is capable of holding OVER 4 cups of frothing liquid. Preferably not plastic. Ceramic is best IMO.
* A source of filtered water.
* kitchen towel and rubber band that can encompass the bowl.
* Space on counter top (in a warm location if possible)
* Dry measuring cup and wet measuring cup. (this is how I measure)
**NOTE: This will take roughly three days, maybe longer since its a fresh culture. Depends on the temperature of the kitchen.
1. Add 2 cups (dry measurement) of flour to the bowl and 2 cups (wet measurement) of filtered water. Stir till flour is evenly incorporated, it will look very soupy.
2. Cover with kitchen towel and secure with rubber band. Place in open space on counter top or somewhere it won't get in the way, some where warm.
NEXT DAY:
1. Add 1 cup flour and 1 cup filtered water. Stir to evenly incorporate and recover.
Repeat for third day.
What to look for with your starter: Bubbles, smells yeasty and looks like it's frothy. If none of the mentioned characteristics are present it could be that the kitchen is too cold or it will take a bit longer for capture of wild yeasts. Ensure warmth and feed with 1:1 ratio each day.
IF bowl is getting too full remove 1 cup. Always ensuring that there is at least 4 cups of starter in the bowl. Then feed 1:1 flour/water. Stir and cover.
Example of a previous starter:

TIP: save a bit of this starter for future bread making. So you have a healthy culture to throw in the mix of new starters. I refrigerate mine and take it out once a week to feed equal parts flour and water. Discard or use half if its getting too full. I keep mine in a mason jar and use in pancakes.
Once starter is nice and healthy it's time for the next fun step, bread making. Its best to start this early in the day to allow it to rise a few hours.
**NOTE: The tutorial I saw, said to leave it all day, from early morning till late afternoon. Granted, it's winter and she heated her home with a wood stove (lives in fairly cold climate) so I'm guessing it took longer to rise. If you live somewhere that is warmer in climate you probably won't need to wait all day. I live in Texas and winters here are NOT cold. In fact, when I made this bread it was mid 70s, my kitchen was around high 70s maybe 80 (I don't have central heat and air, just a green house room attached to kitchen that I use to heat my house to save energy) Took 2-3 hours for a nice rise.
You will need:
* Large mixing bowl
* Salt (I use regular non iodized)
* Flour
* Wet measuring cup
* Dutch oven(deep and medium size) or baking stone (pizza stone, large size)
1. Measure out 4 cups of active starter into large bowl. Add a desired amount of salt. ( I find this is personal preference)
2. Add flour to the starter in the large mixing bowl. This is where you add enough flour to make a sticky, shaggy dough. Careful not to add too much, we don't want this dough dry at all. We want it wet and sticky before we start kneading.
3. Flour surface of counter top very liberally. Scrape sticky dough mixture onto surface and flour top of dough and also your hands. Start kneading with a fold over motion, grabbing dough and folding it toward you. Add flour if it sticks to your hands and to the surface as you knead.
4. You will be kneading for 10 minutes straight. While you are kneading keep in mind we don't want the dough dry and stiff. It will be slightly sticky but shouldn't stick to surface and hands. After 10 minutes of kneading it should have a nice elasticity and hold shape, form the dough into a ball shape.
5. Place the balled dough into either a dutch oven or on a baking stone. I have used dutch ovens but I think it would be better on a baking stone for expansion reasons.
6. Place somewhere warm like in the stove with the light on or on a countertop. I suggest in the stove if possible. You should see a noticeable rise in a few hours. AGAIN, depends on the warmth of kitchen and maybe also humidity. IF your kitchen is cold allow an all day rise, if it stays warm give it 3 hours and check on it.
7. When its time to bake, set the oven to 450 degrees. (remove the rising doughs if they were placed in oven). You can score the tops of the dough before or after the rise, its up to you. Bake for 35-40 minutes. The tops will be brown and it should have risen a bit more while baking. Tap the crust and listen for a nice hollow sound. Remove from oven.
**NOTE: Allow the bread to cool completely before slicing into it.
The crust should be firm and crunchy but not rock hard. The inside soft and light. See attached pic of my first successful breads. Also why I think a stone is better than dutch oven because my tops popped off.

Here is the link to the YouTube video I watched to make my first successful bread. She gave no mention of temperatures or time so I had to figure that out on my own. But the video is golden with how to get things happening.
An American Homestead YouTube channel. Sourdough video link:
https://www.youtube.com/watch?v=xKfGupl0Ztc&t=10s
I will be making more soon!
Weekend Fun
Since moving in to the homestead things have been all about cleaning, fixing and organizing. I think the key to being recharged when faced with large tasks that could take a long time to complete is to just let go and save it for another day.
It's hard for sure, I worry over everything from hardly having storage space to the constant fur and dirt in my house. I have two fluff balls and the doors hardly seal correctly. So I try my hardest to just ignore things that are out of my control, like the constant tumblings of debris from under the front and back doors.
I don't have many responsibilities at the moment, no farm animals and nothing growing just yet so I'm able to get away with jumping into hobbies or just zoning out. It's how I recharge and step away from arduous tasks. Not forever, but for a short time.
The homestead is in the slumber of winter and the only big things we can do here is chop down dead trees and trees we don't want. We have currently one huge pile of brush, limbs, vines and logs. I'm just one person, husband works full time, so I try to not be too hard on myself or him when it doesn't get moved or stored in long term locations. If I had my way I would be out there everyday BUT sometimes a healthy break is needed. My husband reminds me when I need to hear those words.
Things I have lost myself in when I need a break:
Brewing was introduced to me by a dear friend. I have successfully brewed 3 out of 4 batches of tasty lemon and apple flavor meads. My last batch I buggered up with some fruit that may have had spores of mold. Expensive mistake that had me bummed out for a couple of days. I will post in another article my novice attempts at brewing.
Sourdough...sourdough. SIGH. OK, I have attempted this monster for a little over a year. I followed recipes from chefs, from bakers and from down home country folk on YouTube. It's an art form that requires the right instructor and after a year and some change I finally found a recipe that clicked. I will be posting that separately as well. Promise!
Also in addition to hobbies which also include yarn spinning and crocheting I have been in research mode for all my seeds. I have each packet filed under dates of when to start indoors and when to plant outdoors. As much as I would absolutely love to plant each thing the winning seeds were decided by heirloom, diversity in the garden and what would be feasible for me to handle alone. I'm a first timer when it comes to creating a large garden and I only ever had one raised bed that I tinkered in late summer and autumn. I have to get my feet wet and slowly grow the garden in size each year.
Perhaps I think too hard on things but I'm sure over the years choices will be made with ease when I know what works well in my area and what I'm able to handle.
As much as I need time off from things I also need a boot to the butt when it comes to getting things started. This blog helps me get my head in the right space to just go out and do the things I have dreamt of.
This rambling was more for me and there maybe more. :)
Subscribe to:
Comments (Atom)